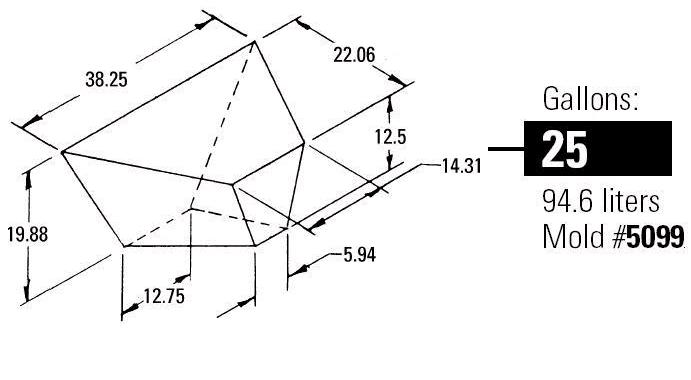
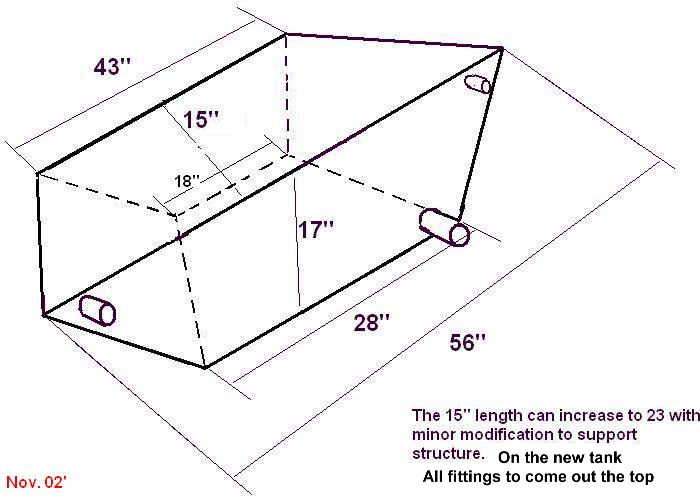
Below are the dimensions of my 40 gallon Florida Marine Tank. Not show are the one and a half inch diameter gauge and two and 1/2 inch diameter clean out port in the center of the top. This one came with my boat in 1980
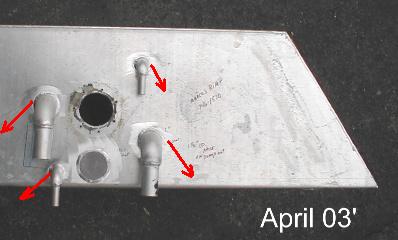
There had been some smell under the VEE berth. The place that transferred smell by the rub method was right under the pump out connection at the lower aft, starboard side of the tank. The connecting pipe had Permatex contamination that may have prevented a good seal from being created even after the two hose clamps exerted their force.
The plan is to cut off the old pump out connecting pipe and weld it shut. Then replace it with a 1 1/2 inch diameter dip tube through the three inch inspection port opening...
My reasoning is that if the connection is up on top it will never
be under pressure and will be less likely to leak. After all fuel tanks
only have fittings on the top surface of the tank for that very same reason.
Dip tubes are commercially available. The Ocean Links dip tube kit is P/N
In keeping with the fuel tank idea of having all connections on the top surface of the tank The input port from the aft port side of the tank to the top side of the tank. It will be close to the center of the tank to minimize the reliance on the head's joker valve when on starboard tack.
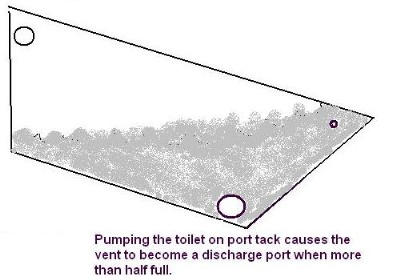
The single, 5/8" vent on the aft starboard side will be moved to the top of the tank and much closer to the center of the boat to minimize the amount of fluid that can go up the vent tube when the boat is heeled over. Really bad if on port tack and someone actually uses the head as it pumps the stuff right out the vent port on the side of the boat. It will be increased in size to 3/4"
A second vent will be added on the top per Peggie Hall's suggestion at her web site. The second vent will be in close proximity to the center of the tank. I can not see my way clear towards running the vent line up to the anchor locker and then up to the top of the bow to a through hull. She has now written a book, and is now the moderator on the Head Mistress Forum.
.
It is going to be challenge to keep these two vent lines empty as there is a two foot horizontal run along the bottom of the VEE berth to the lockers on the side of the boat that are used to run the vent lines up to the toe rail region. This is going to need some creative thinking. What I have done in the past is fill a half gallon, plastic milk jug with water. Then put the neck of the jug over the vent on the side of the boat. Once in place I squeeze the jug and force water down the vent line to clean it out. Later, with an empty milk jug, air can be forced into the vent line to clear the remaining liquid. If the tanks are pumped out regularly the vent lines will not fill up as easily.
This page was last updated on: January 4, 2017

Aerator by Groco
Holding Tank Eye by Boton
Sanitation concepts by Peggie Hall
Sanitation Forum all boats by Peggie Hall, The Head Mistress
Dip Tub ideas and vendors
Thru-Hull Vent Fittings & ideas
Interesting schematic for Holding Tank and Toilet system
This page started in Oct. 02'
added need for cup on bottom for dip tube to be able to remove all but 1 pint 15 May 08'. Found there is only 1.5 gallons remaining after pump out. Oct 08'
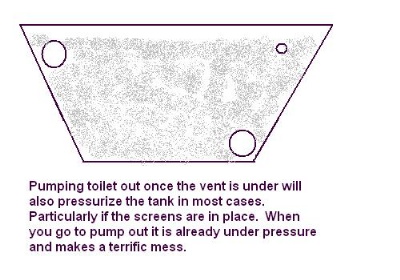
Much too easy to fill the vent line with black water while on Port Tack
If tank is pressurized and you go to open the deck fitting the black water comes right up on the deck and covers the deck with an 1/8" inch layer of old toilet paper and other black water remnents till the pressure is fully relived. So make sure your vents are clear and don't put them in a spot where they can ever be immersed.
Loading
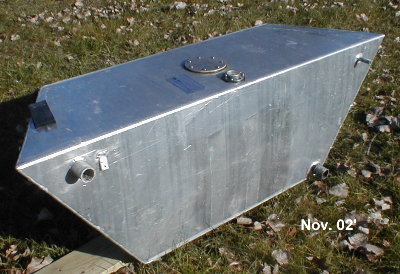
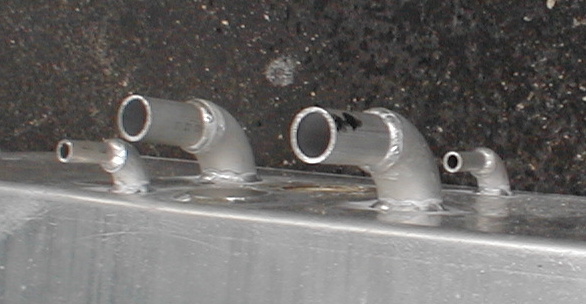
For 2003, The holding tank was modified so that all connections are on the top and within six inches of the center.
1. 1 1/2".Discharge with dip tube
2. 1 1/2" Inlet
3. 3/4" starboard vent (inadvertantly made 5/8" the first time)
4. 3/4" port vent (inadvertantly made 5/8" the first time)
5. 2 1/2 " clean out port (same as old one)
6. 1" port for a Bonton Holding Tank Eye
I forgot to tell the welder to put the elbows at a 30 degree angle off of the centerline. The ones on the starboard to the starboard and the two on the port to the port side. I should also have found some barbs instead of the stubby pipe sections to mate with the hose.
Note, the outlet pipe goes all the way to the bottom of the tank (know as a dip tube) and at the bottom for two inches it is a half pipe like the snow boarders use so that the tank can not deflect too much when pumping. Sturgeon Bay has a tremendous number of guys that can do aluminum welding as well as heli arc stuff. Note: inspection cover is not attached at the moment.
Plan view below.
Elevation view ( from the aft end of the boat)
The 25 gal Kracor tank below, was installed on another Mariner 36. They are really disappointed with the decrease in capacity. There is no odor and that was satisfying.
Old arrangement of ports
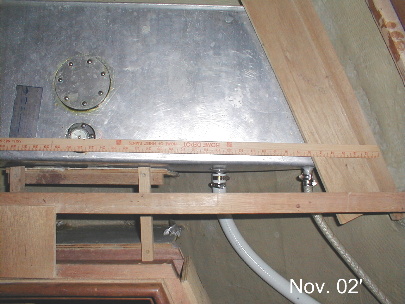
This is how it
looked in 2002

What I have learned is that I should make the dip tube go down into an area that has a small volume so that about 1 pint is left in the tank after fully pumped out. See diagram above. It will need a lot less antifreeze during the winter and it will get most everything out even during the summer. That would make it easier to get rid of residual smell coming out the vents after emptying the tank and flushing it a bit. In the fall of 2008 I removed the black water that was left after the last pump out, It was 1.5 gallons. I also noted that the toilet can easily contain about 3 pints of fluid, so it may be a great idea to pour a gallon of RV anitfreeze into the toilet and pump it out while doing the final pump out at the end of the season so that the last three pints of water can get into the tank and sucked up.
The head is a Wilcox Crittenden Model number 1460-C “Head-Mate” Seaclos. Hope to replace it with Jabsco 29120-3000 the 19 inch if it will fit. I don't know if the existing bolt pattern will fit. I did get a rebuild kit #1520 and in the process I tightened the Inlet Valve Cover (019596) too tight and cracked it. I did get a replacement from the Thetford Corporation, of course their part numbers are not the same as the original Wilcox Crittenden numbers. Works just fine now.